
This page reviews how to allow specific students to access a course after the term ends in order to finish an incomplete. It also explains how to properly "close" a Canvas course and what restrictions that introduces.
It is not recommended that instructors keep courses "open" merely to have access to the materials to use in future courses. Doing so keeps the course open for all the students, which they may not want to see. Instead, instructors should create a 'sandbox' shell in their account with no enrollments and store the course materials there.
Closing Courses & Incompletes
Incompletes present a special situation where only specific students need access to a course after the course end date. To do this, instructors create a special section of the course in Canvas.
Part 1: Create a new section
-
- Below the list of sections, provide the name for the new section (e.g., Incomplete)
- Click "+ Section". The new section appears in the list of sections.
- Click the name of the new section.
-
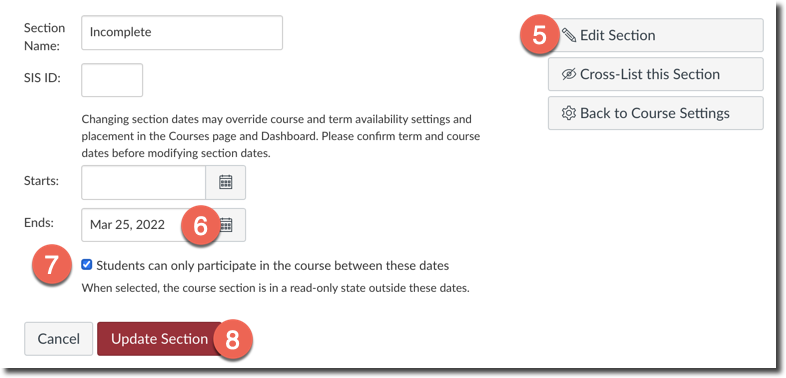
- In the Ends field, enter the date that the incompletes must be completed by.
- Important: check the box "Students can only participate in the course between these dates"
- Click "Update Section"
Now you need to add the students to the new section.
Part 2: Enroll students in the new section
-
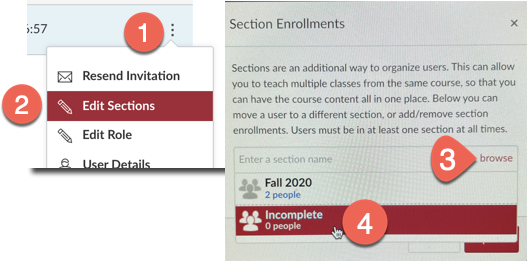
- Click the '3 dots' menu for the student and select "Edit Sections"
- In the pop-up that appears, click the "Browse" link.
- Choose the section that was created above. The new section is added to the sections that student is already enrolled in.
- It is not necessary to remove the student from the default course section.
- Click "Update" to finish the process
Repeat these instructions for any other student who needs to be part of the Incomplete section.
Part 3: Close the course for other students
With the new Incomplete section in place and students enrolled into it, it's time to close the course to the other students.
- Review the instructions given at the top of this page on "How to close a course"
Part 4: Create custom due dates for Incomplete students
Canvas assignments and quizzes can have different due dates for different students. For each activity to be completed by the students in the Incomplete section, add a custom due date window in the activity settings.
Note: Never change or delete an existing due date window! Doing so will unassign the activity to those students and hide their work and grades for the activity.
Read more: How do I assign an assignment to an individual student?
Canvas does not automatically close your course at the end of the term! Because each instructor is responsible for opening their course on their preferred date, they are also responsible for closing it. However, one year after the term has ended (according to the university calendar), OAT will conclude the term in Canvas. Doing so will close any remaining open courses from that term.
Closing a course sets it to the "Concluded" status and moves it into the Past Enrollments course list for you and your students. By default, closed courses can be viewed by students and instructors, but they cannot be edited by instructors (including adding new users) or participated in by students. Instructors do have options to address various situations. Read on for details.
How to Close a Course
Warnings
1) Do not close your course yet if you need some students to continue accessing it to resolve an incomplete. Set up the incomplete section first and then close the course. See the bottom of this page for more information about incompletes.
2) Do not close your course until you are ready to stop updating it. Once closed, it is also closed to updates and changes by instructors!
-
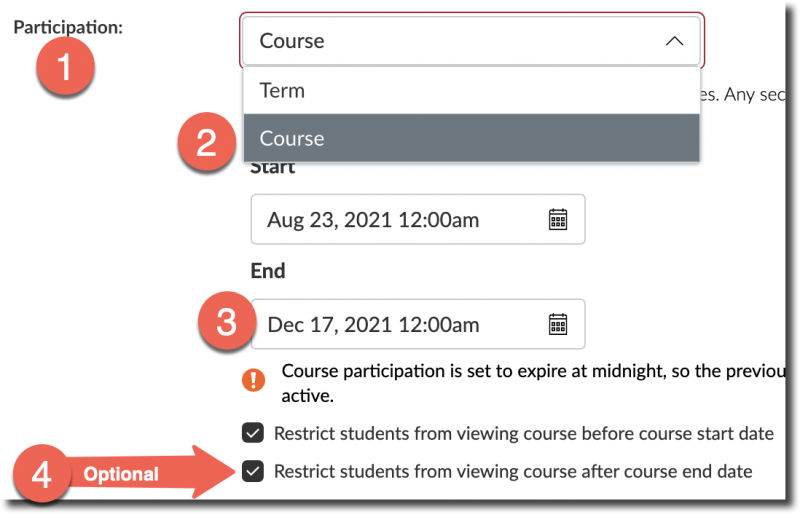
- Change the dropdown menu to "Course".
- In the End field that appears, supply the ending date you would like for the course.
- Optionally, check the box to "Restrict students from viewing course after course end date".
-
What this does: that checkbox will hide the course completely from students, including from their list of Past Enrollments.
-
- Click Update Course Details at the bottom of the page.
Closed courses will not disappear from the Dashboard if the course was deliberately 'starred' as a Favorite. To remove a favorite course from the Dashboard, open your All Courses link and unstar the course in question.
Course Access After Closing
To access a concluded course, click the Courses menu and then click the "All Courses" link. The course will be found in the Past Enrollments area of your course list. Click on the course name to open it.
Using a Closed Course
Instructors
The following instructor actions are allowed with a concluded course:
- Download grades to a CSV (Excel) file
- Use as a source for copying into a new course
- Export a course to local computer
- Access material using visible navigation links (any links that were hidden from students will be hidden from instructors as well in concluded courses)
The following instructor actions are not allowed with a concluded course:
- Edit/change/upload course content (incl. assignments, quizzes, discussions)
- Edit/change Grades
- Add users
- View/download Analytics
- View/download Item Analysis within Quizzes
- Send a message to the whole class within Canvas (individual messages still ok)
- Change any class settings
- Change/update class navigation
Students
The following student actions are allowed with a concluded course by default:
- Access the course via All Courses > Past Enrollments
- View Grades and feedback
- View course content (incl. downloading files as during the course)
- View Discussions and Assignments
- Send a message to the instructor
The following student actions are not allowed with a concluded course:
- View Quiz questions and answers
- Submit discussions, assignments, quizzes, and other course activities
Restrict Closed Courses Further
As mentioned previously, by default, concluded courses are still visible to students in read-only mode. This enables students to return to the course material and activities as reference in future classes. However, instructors can still restrict student access in additional ways if desired.
Option 1: Restrict the entire course after course end date
Instructors can completely remove the course from students' Past Enrollments, preventing them from accessing it at all. In the course Settings, check the box for 'Restrict students from viewing course after end date' and click Update Course Details. Instructors will still have read-only access via Past Enrollments; only students' access is removed.
Option 2: Keep course visible but hide course navigation menu links
Use this option to allow students access to specific general areas of the course but not to others. For example, instructors may wish to hide the Modules page but leave the Grades link available. Use the regular controls at Settings > Navigation to disable specific course areas and hide them from student view (don't forget to click 'Save' at the bottom!).
Caution: In closed courses, hidden navigation menu links are hidden to both students and instructors.
Option 3: Hide specific course content
This option is really only applicable to instructional materials on the Modules page. To hide specific items, simply unpublish the item in question. However, do not unpublish items that contain student participation (assignments, discussions, etc.) For help with those types of content, contact oat@csustan.edu.
Questions?
Contact oatsupport@csustan.edu if you need assistance with any aspect of closing a course.
Updated: June 27, 2025