
An ongoing repository of tech tips and announcements from OAT for the Stan State community.
OAT Updates
OAT sends out a bi-weekly newsletter to all faculty containing tech tips and other information. Check your email on Friday afternoons for the latest issue!
For questions about any of these tips, please contact oat@csustan.edu.
** Pardon the dust as we revamp the older tips on this page to make discovery easier for everyone! **
Canvas Tips
- Use Module requirements to force course materials into a sequence
- The Canvas Inbox cannot be disabled for specific courses
- Use "Until" wisely in Canvas quizzes
- Randomize/Shuffle questions in a "classic" Canvas quiz
- Add custom links to the course navigation in Canvas
- Understanding group discussions in Canvas
- Merge multiple Canvas sections to a single course
Panopto Tips
Zoom Tips
FlipGrid Tips
GoReact Tips
Following Tips on using Canvas:
January 14, 2022
- Hide previous courses & declutter your
- Change the name of a Canvas Course
- Announcing "Discussions Plus" for enhanced Canvas discussions
August 16, 2021 - Special PIVOT Edition
August 3, 2021
- New Feature Alert - Use Hypothes.is for group annotations
- Prevent immediate availability of Zoom recordings in Canvas
April 23, 2021
- Summer 2021 Update to Canvas + iClicker Cloud integration
- New VoiceThread assignments coming June 30; Training session June 4
- 'Email' your class using Canvas announcement rather than an Inbox message
January 15, 2021
January 8, 2021
- Updates to the Canvas rich content editor coming January 16.
- Merge Canvas sections to a single course
- View Zoom attendance reports
December 18, 2020
December 11, 2020
- Understanding the "Until" setting Canvas assignments and quizzes
- Use Late Policy setting to automatically grade missing assignments at 0
November 24, 2020
- Deleting Panopto videos from a Canvas
- Track students' progress in a live Canvas exam
- Use Turnitin with a Canvas grading rubric
- Record webcam video in Canvas using Panopto Capture - no software required
October 16, 2020
September 25, 2020
Hide previous courses & declutter your Canvas dashboard
Note: It is not possible to "unpublish" a Canvas course after students have participated in it. Once it's published and students have submitted any content (assignments, tests, discussion posts, etc.), the instructor may only restrict access after the semester by setting the course End date.
Note: It is not possible to "unpublish" a Canvas course after students have participated in it. Once it's published and students have submitted any content (assignments, tests, discussion posts, etc.), the instructor may only restrict access after the semester by setting the course End date.
- Close previous courses. In a course, go to Settings and scroll down to the "Participation" area of the page. Change the dropdown from Term to Course and enter and "End" date. At the bottom of the page, click "Update Course Details". This will put the course into Read Only mode and will prevent it from showing up in certain other areas of Canvas and will usually remove it from your Dashboard. If the course is still on your Dashboard, read on for Tip #2. Important: You can import the contents of the closed course into future courses, but you cannot interact with it other than looking at it.
- Choose which courses appear on the Dashboard. By now, most faculty have more courses in their account than will fit on the Dashboard, and the courses that are there may be old or otherwise not the ones you want. Click on your All Courses link to choose the courses for your Dashboard (up to 10). On that page, click the "star" icon to select a course for the Dashboard. Un-star a course to remove it. Note that the stars only identify your "favorite" courses. Unstarring does not delete the course from your account.
Change the name of a Canvas course
Instructors have full capability to edit the display name of their Canvas courses. Open the Settings page and change the "Name" field. To change the course code (i.e., the 'short name' that appears at the top of the page inside a course), edit the "Course Code" field. Click "Update Course Details" to save your changes.
Announcing "Discussions Plus" for enhanced Canvas discussions
OAT has initiated a pilot in Spring 2022 for a tool we're calling Discussions Plus. Discussions Plus offers several enhancements over the default Canvas discussions tool, such as multiple due dates for discussions and auto-captions on video recordings in posts. Check out our Discussions Plus overview and let us know what you think!
Communicate your teaching plans
Use the PeopleSoft roster email tool first to email your class about what they can expect. Send subsequent communications using the Canvas Inbox tool or create an Announcement in each course. Canvas will relay both of those to the students via a notification, but students may have set up their Canvas notifications to delay receiving them.
Use Canvas' Zoom tool to schedule meetings
Use the Zoom tool in each Canvas course to schedule your course meetings. Both you and your students will use that tool to join the meeting - no need to send out a link separately.
Troubleshooting tip: If you see an error about your email address being "invalid" when trying to schedule a course meeting, first login to https://csustan.zoom.us and then return to Canvas and try scheduling the meeting again.
New Feature Alert - Use Hypothes.is for group annotations
Hypothes.is can now be used for group annotation activities in Canvas. To use Hpothes.is with groups, [1] create the groups in Canvas (or at least create the Group Set you plan to use with Hypothes.is). In the assignment set-up for Hypothes.is, [2] select the PDF document the class will annotate and then click the box for "This is a group assignment." Finally, [3] choose the Group Set to connect with the activity.
Prevent immediate availability of Zoom recordings in Canvas
Use Panopto's "Approval Workflow" to keep your course Zoom recordings unpublished until you're ready to release them to students. This workflow allows you time to edit the recording, if necessary, before releasing it for viewing in the Panopto Recordings area of your Canvas course.
Summer 2021 Update to Canvas + iClicker Cloud integration
Benefits of the RGS integration include:
- Quick & easy setup
- No need for any additional setup or preparation from inside Canvas. Connecting your Canvas course is done completely from inside iClicker Cloud in just a few clicks.
- Ability to pull your Canvas roster into the corresponding iClicker Cloud course
- Your Canvas roster is used to pre-populate your iClicker roster.
- Assistance in getting your students ready to use iClicker before classes start
- When you sync your roster, iClicker students with emails matching your Canvas roster will be automatically added to your course.
- If a matching account is not found in the iClicker system, we make it easy for you to let students know what they need to do to update their existing account or create a new account.
- No additional linking steps for students
- Students’ iClicker accounts are automatically linked to their Canvas identity by matching their email address. With RGS, students do not need to take any additional action, such as clicking a link in Canvas, to associate their account.
For more information about setting up RGS in a Canvas course, consult the iClicker documentation. If you need further assistance with iClicker Cloud, contact Stephanie Bragg at iClicker support.
New VoiceThread assignments coming June 30; Training session June 4

VoiceThread has improved the way instructors and students create, use, and grade assignments. Beginning June 30, all new VoiceThread assignments will use the new experience.
Features of the new experience include:
- No need to create two links in a course when you want students to create and share a VoiceThread with the class
- As part of the assignment creation, the instructor can tell VT to create a gallery view automatically. Students simply return to the same VT link in Canvas to view the gallery after submitting.
- Easily reuse a VoiceThread from semester to semester or in multiple sections in the same semester.
- The new workflow automatically makes a copy of your VT for use in an assignment. This keeps student comments from getting mixed up with other sections or semesters.
- Better instructions for students to understand exactly what they need to do to complete an assignment.
- VoiceThread will guide the student through the submission process more clearly.
- Improved grading interface
- Clearer understanding of who has not submitted and where they are in the process
- Ability to grade a student who has not fully submitted yet
Instructors can begin using the new workflow immediately if desired. The full switch-over will happen on June 30, 2021. Read the Instructor Guide (w/ demo video) || New assignments overview
'Email' your class using a Canvas announcement rather than an Inbox message
The Canvas announcement tool is a quick and simple way to compose a message to your entire class that will be relayed to the student via their email address. It also appears on their Canvas Dashboard and in the Canvas smartphone app. The Canvas Inbox tool is best reserved for contacting specific students or small groups of students. When sent via the Announcements tool, your message will be permanently stored as part of the course content, right on the home page. This is often easier to understand and harder to miss compared to using the Inbox. OAT often gets reports of students who do not receive Inbox messages, and it's confusing to try to understand that these messages are not actually 'email'. Using Announcements is a more efficient solution to classwide communication.
Request a dummy account for External Tools in Canvas
Canvas's "Student View" does not work for any content that has been added using an External Tool. For example, Student View cannot be used to test or check Turnitin assignments or VoiceThread assignments. This is because the Student View is not an real Canvas account, and all External Tools can only be accessed by real Canvas accounts.
How to conclude a Canvas course + Incompletes
At the end of the term, instructors can close their course by setting an End date in the Settings. This will make the course 'read-only' for all students while still allowing instructors regular access. Additionally, if specific students require extended access to the course to complete an incomplete, instructors can create a new section in the course and enroll those students there. The new section can be configured with its own End date overriding the date set in the general course settings. Existing activities can then be modified to add the new section and give it a custom due date, etc.
How do I change the start and end dates for a course?
How do I add a section to a course as an instructor?
Updates to the Canvas rich content editor coming January 16.
Canvas is rolling out an automatic update to the rich content editor (RCE) on January 16. The RCE is the tool you use to type and format text in many places in Canvas, such as discussion posts, pages, and assignment instructions. The update will affect all users, including students. Read more information about this change and learn what's new!
Merge Canvas sections to a single course
Instructors can merge the enrollments of one Canvas course into another, in a parent-child relationship. This enables you to deploy content in a single course while still preserving separate due dates for each section. Read more information about this option.
View Zoom attendance reports

You can obtain basic information about the attendance of your Zoom meetings, whether they are scheduled using the Canvas scheduler or via the regular web interface. Watch the video for instructions related to both cases.
Restore deleted items in Canvas
If you've accidentally deleted an activity in your Canvas course, such as a quiz or an assignment, it may be possible to restore the item. Go to your course and modify the URL to add /undelete after the course number and press <Return> on your keyboard. Do not include any other characters. For example, the URL should look like this: https://csustan.instructure.com/courses/1234/undelete
When you arrive at the Restore page for the course, click the "Restore" button next to the item to be restored.
Note: the number of items available to restore is based on when you deleted them. If you don’t see the item on the list, you’ll need to contact OAT and we will work with Canvas to have it restored for you.
Understanding the "Until" setting in Canvas assignments and quizzes
It's easy to misunderstand how the "Available from" and "Until" settings work in the real world. They both seem to be about governing access to an item, but that's really only true of the Available from setting. Until is more nuanced: it governs when an activity must be finished.
- For assignments, this means when a submission must be received, even if the student clicked the link before the Until date.
- For quizzes, this means when all attempts must be completed, even if the student started the quiz before the Until date.
Important: the Until date will override a timer and autosubmit a quiz attempt if it occurs before the timer ends. So, if you use a timer and an Until date, be sure to confirm you've allowed enough of an availability window for the students to start and complete the quiz within the Until window. Also, communicate this information to your students: they must finish the quiz before the Until date even if time remains on the countdown.
Thus, it is not possible in Canvas to design a synchronous test (i.e., everyone starts at nearly the same time) and block a student who tries to start "late."
Additional Resources
- What is the difference between assignment due dates and availability dates?
- How do I make a quiz available before or after the due date?
Use Late Policy setting to automatically grade missing assignments at 0
At the end of a term, you often need to complete your grading by addressing the status of missing assignments. Typically, instructors score missing assignments with 0 points. Canvas makes this easy to set up using the Late Policy setting of the Grades page. On the Grades page, open the Settings cog (upper right). Then, check the box for "Automatically apply grade for missing submissions" and specify a percentage grade for any missing assignment/quiz/discussion. This setting affects the whole course. However, you can manually change any 0 grade in the spreadsheet if necessary.
More information: How do I apply a Missing Submission policy in the Gradebook?
Deleting Panopto videos from a Canvas page
It's always good to add Panopto video to your Canvas course by embedding a video on a page, but sometimes you need to delete one. Unfortunately, the Canvas editor doesn't have an easy "one click" way to remove an embedded video because of the how the underlying HTML code works that makes embedding possible. Never fear! Read our how-to guide for instructions on removing a Panopto video from a Canvas page.
Track students' progress in a live Canvas exam
When you give a timed exam synchronously using Canvas, it is possible to monitor your students' progress while the exam is open. For example, this allows you to know at a glance who has finished and who is still working. To do this, simply open the quiz link in your course and then click Moderate This Quiz from the "Related Items" menu on the right. Students' progress will be indicated in the "Time" column of the page. To get further details about a specific attempt, click the student's name and then click the "View Log" link.
Use Turnitin with a Canvas grading rubric
Not only does Turnitin check student papers for plagiarism, it offers instructors a way to annotate, comment on, and grade submissions, with grades passed back to the Canvas grade book. But what if you want to grade submissions in the usual Speedgrader interface, with a Canvas rubric, while using Turnitin only for a quick plagiarism check? Here's how:
- Create the Canvas assignment first as a regular online submission assignment and then save.
- Next, create the Canvas rubric and enable it to be used for grading.
- Then (here's the cool part!), click the Edit button to edit the assignment and change the Submission Type to "External Tool", configuring it for Turnitin. Be sure to uncheck the box for "Load in a new tab".
When it comes time to grade, simply click the assignment link in Canvas. This will display the Turnitin inbox so you can quickly see the originality scores of the submissions. Off to the right will be the usual SpeedGrader tool. Click that to read the submissions and assign grades using the rubric.
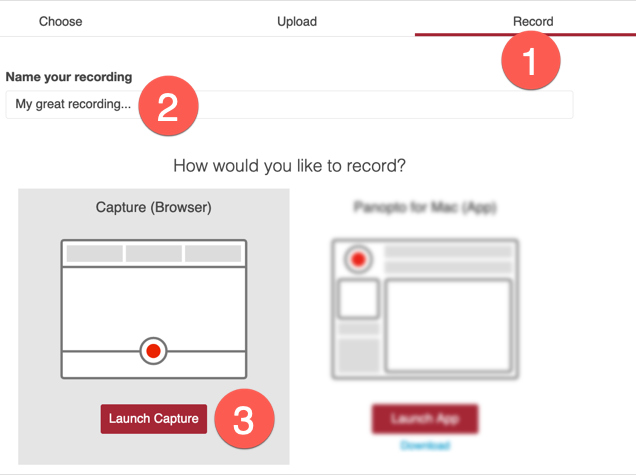
Record webcam video in Canvas using Panopto Capture - no software required
Panopto Capture is a feature in Panopto that enables all Stan State users to record their webcam and/or desktop without the need to download and install any software. Do this wherever you can access Panopto, such as in a module, or by editing a page, or by posting a reply in a Canvas discussion, etc. First, launch the Panopto integration and click the "Record" tab. Second, supply a name for your new recording. Third, click the red "Launch Capture" button. View screenshot. The Panopto Capture tool will open and you can begin your recording. After finishing, stop the recorder and wait for Panopto to process your video. Then, close the Panopto Capture tab to return to Canvas. Click the "Insert" button to insert the video. Read more information on how to use Panopto Capture.
Note: Panopto Capture is recommended over Canvas' built-in video recording tool because Panopto will automatically create and insert closed captions. If desired, students may use the built-in Canvas recorder for recordings that will only be viewed by the instructor.
Automatic importing of Canvas-Zoom meetings to Panopto
If you schedule a meeting using the Zoom link in Canvas, the recording will automatically be copied to the course's Panopto library. Zoom meetings that are not scheduled using Canvas are not automatically copied and must be moved manually for the time being. Once the recording is in Panopto, you can make it available in Canvas in a variety of ways, and even add a quiz to it!
Add custom links to the course navigation in Canvas
Canvas’ navigation menu is generally not editable by instructors, but did you know it’s possible to add a custom link? Do this using the Redirect Tool found in the app list of the course Settings. You can add as many custom links as you like and they can be reordered in the navigation list just like any other item. Learn more at Redirect Tool instructions.
Rename a course in Canvas
Sometimes Canvas’ user interface makes it impossible to tell courses apart, especially when you’re teaching multiple sections of the same course. The solution? Simply edit the name of the course on the Settings page to something more distinct. Be sure to make the new course name recognizable to students!
Use Turnitin with Canvas
Stan State’s site license for Turnitin is readily available in Canvas – no need to add the app to your own course. Instead enable Turnitin as an External Tool submission type in an assignment. Learn more at Turnitin + Canvas instructions.

Following Tips for Panopto:
January 14, 2022
August 16, 2021
August 03, 2021
January 29, 2021
November 24, 2020
- Deleting Panopto videos from a Canvas page
- Record webcam video in Canvas using Panopto Capture - no software required
October 02, 2020
Camtasia can now upload into Panopto
Camtasia 2021 has a great new feature that allows you to export projects directly into the My Folder of your Stan State Panopto account. This makes it very easy to add content produced using Camtasia in a Canvas course while keeping your content safely in the 'walled garden' of Stan State tools. Camtasia 2021 is available faculty and staff only. Visit OAT's Camtasia information page to download and register the software.
Find Zoom recordings in Panopto Recordings folder
Recordings of course Zoom meetings will be automatically available under the Panopto Recordings link in each course a couple of hours after the meeting is over.
If you do not wish the meeting recordings to be available automatically, you can either hide the Panopto Recordings link in the course navigation or enable the Approval Workflow to require manual approval of each video in that folder. See this page for more details: https://www.csustan.edu/office-academic-technology/canvas-how-control-availability-zoom-recordings
Disable "seek" and playback speed in a Panopto video
At times, you may want to prevent students or other viewers from skipping ahead in your video (seeking) or changing the playback speed. Perhaps you have created a quiz at the end of a section of the video and viewers really need to have watched the video in order to successfully complete the quiz. Limiting seek and playback speed forces the viewer to watch the whole video as you intended it. Login to Panopto and click the Settings button for the video and choose "Manage" from the left-hand menu. Locate "Disable seek and variable speed playback" and change the setting as desired.
Use Panopto with Moodle courses
Instructors who use Moodle can now use Panopto in their courses via the new Moodle integration. The Panopto tool is readily available in the Moodle text editor. Click the Panopto tool to share a previously uploaded video, upload a new video from your computer, or record a new video directly into the text editor. Coming soon: Panopto videos that have a quiz embedded in them can be used as a graded Moodle assignment.
Important! Using the Panopto-Moodle intregration creates an account in Panopto that is independent of any Panopto account you might have as a result of using the Panopto-Canvas integration. For help accessing videos across accounts, contact oat@csustan.edu.
Deleting Panopto videos from a Canvas page
It's always good to add Panopto video to your Canvas course by embedding a video on a page, but sometimes you need to delete one. Unfortunately, the Canvas editor doesn't have an easy "one click" way to remove an embedded video because of the how the underlying HTML code works that makes embedding possible. Never fear! Read our how-to guide for instructions on removing a Panopto video from a Canvas page.
Record webcam video in Canvas using Panopto Capture - no software required
Panopto Capture is a feature in Panopto that enables all Stan State users to record their webcam and/or desktop without the need to download and install any software. Do this wherever you can access Panopto, such as in a module, or by editing a page, or by posting a reply in a Canvas discussion, etc. First, launch the Panopto integration and click the "Record" tab. Second, supply a name for your new recording. Third, click the red "Launch Capture" button. View screenshot. The Panopto Capture tool will open and you can begin your recording. After finishing, stop the recorder and wait for Panopto to process your video. Then, close the Panopto Capture tab to return to Canvas. Click the "Insert" button to insert the video. Read more information on how to use Panopto Capture.
Note: Panopto Capture is recommended over Canvas' built-in video recording tool because Panopto will automatically create and insert closed captions. If desired, students may use the built-in Canvas recorder for recordings that will only be viewed by the instructor.
Use Panopto to store video files
Uploading a video file directly into a Canvas course is not recommended because of file upload limits as well as accessibility issues. Instead, use Panopto! All instructors have personal video storage accounts as well as Panopto folders for their Canvas courses. To get started, login to Panopto and click "Create" to begin uploading your media files.
Add a Panopto video to a course
In Canvas, add a link to a Panopto video in a course module. Or, embed your video on a course page. Blackboard and Moodle courses can share a video via URL.
Track Panopto video engagement
When you add a Panopto video to a Canvas course (see Tip Add a Panopto video to a course), you can also get information about which students have watched it and how much they've seen. Learn more about session statistics.
Make your PowerPoint slides searchable in Panopto
In addition to speech transcription, Panopto can also read and transcribe your PowerPoint slides during recording. This means the text on the slide will be searchable by viewers who may want to review that portion of your recording. In the Panopto Recorder, simply check the "Record PowerPoint" box in the Slides panel of the recording setup. Bonus Bonus (because you've read this far...): if you use slide titles in the PowerPoint file, Panopto automatically converts the titles into a Table of Contents in the final video.
Following Tips for Zoom:
August 16, 2021 - Special PIVOT Edition
August 03, 2021
January 15, 2021
January 08, 2021
October 16, 2020
September 25, 2020
Use Canvas' Zoom tool to schedule meetings
Use the Zoom tool in each Canvas course to schedule your course meetings. Both you and your students will use that tool to join the meeting - no need to send out a link separately.
Troubleshooting tip: If you see an error about your email address being "invalid" when trying to schedule a course meeting, first login to https://csustan.zoom.us and then return to Canvas and try scheduling the meeting again.
Find Zoom recordings in Panopto Recordings folder
Recordings of course Zoom meetings will be automatically available under the Panopto Recordings link in each course a couple of hours after the meeting is over.
If you do not wish the meeting recordings to be available automatically, you can either hide the Panopto Recordings link in the course navigation or enable the Approval Workflow to require manual approval of each video in that folder. See this page for more details: https://www.csustan.edu/office-academic-technology/canvas-how-control-availability-zoom-recordings
Prevent immediate availability of Zoom recordings in Canvas
Use Panopto's "Approval Workflow" to keep your course Zoom recordings unpublished until you're ready to release them to students. This workflow allows you time to edit the recording, if necessary, before releasing it for viewing in the Panopto Recordings area of your Canvas course.
Add Zoom recordings to VoiceThread presentations
It is now possible to import a Zoom cloud recording directly into a slide in a VoiceThread presentation. When adding media to the VoiceThread, simply choose the "Media Sources" option. Then, click the Zoom icon to view your Zoom account. Locate the recording and select it for import. VoiceThread will import and treat it as a video slide, much like any other mp4 video file.
How to import media from other sources
View Zoom attendance reports
You can obtain basic information about the attendance of your Zoom meetings, whether they are scheduled using the Canvas scheduler or via the regular web interface. Watch the video for instructions related to both cases.
Allow students to choose their own breakout rooms in Zoom – just announced
Quick, update the Zoom software on your computer to version 5.3! Zoom has updated breakout rooms so meeting hosts can now allow participants to choose the breakout room they want to join. You can also allow them to move from room to room on their own. All meeting participants must be using Zoom 5.3 to take advantage of this new functionality.
Following Tips for Turnitin:
December 11, 2020
-
Submit student paper to Turnitin.com using Quick Submit
November 24, 2020
- Use Turnitin with a Canvas grading rubric
September 25, 2020
- Use Turnitin with Canvas
Submit student paper to Turnitin.com using Quick Submit

It is possible to check a student's paper for plagiarism using Turnitin without creating a specific Turnitin assignment for the whole class. It's called Quick Submit, and it happens at the Turnitin web site.
- Go to the Turnitin website and request a new password using your Stan State email address. Then, log in.
- Enable Quick Submit for your account
- Submit a paper via Quick Submit
Use Turnitin with a Canvas grading rubric
Not only does Turnitin check student papers for plagiarism, it offers instructors a way to annotate, comment on, and grade submissions, with grades passed back to the Canvas grade book. But what if you want to grade submissions in the usual Speedgrader interface, with a Canvas rubric, while using Turnitin only for a quick plagiarism check? Here's how:
- Create the Canvas assignment first as a regular online submission assignment and then save.
- Next, create the Canvas rubric and enable it to be used for grading.
- Then (here's the cool part!), click the Edit button to edit the assignment and change the Submission Type to "External Tool", configuring it for Turnitin. Be sure to uncheck the box for "Load in a new tab".
When it comes time to grade, simply click the assignment link in Canvas. This will display the Turnitin inbox so you can quickly see the originality scores of the submissions. Off to the right will be the usual SpeedGrader tool. Click that to read the submissions and assign grades using the rubric.
Use Turnitin with Canvas
Stan State’s site license for Turnitin is readily available in Canvas – no need to add the app to your own course. Instead enable Turnitin as an External Tool submission type in an assignment. Learn more at Turnitin + Canvas instructions.
For questions about any of these tips, please contact oat@csustan.edu.
1. Hide previous courses & declutter your Canvas dashboard
Note: It is not possible to "unpublish" a Canvas course after students have participated in it. Once it's published and students have submitted any content (assignments, tests, discussion posts, etc.), the instructor may only restrict access after the semester by setting the course End date.
Note: It is not possible to "unpublish" a Canvas course after students have participated in it. Once it's published and students have submitted any content (assignments, tests, discussion posts, etc.), the instructor may only restrict access after the semester by setting the course End date.
- Close previous courses. In a course, go to Settings and scroll down to the "Participation" area of the page. Change the dropdown from Term to Course and enter and "End" date. At the bottom of the page, click "Update Course Details". This will put the course into Read Only mode and will prevent it from showing up in certain other areas of Canvas and will usually remove it from your Dashboard. If the course is still on your Dashboard, read on for Tip #2. Important: You can import the contents of the closed course into future courses, but you cannot interact with it other than looking at it.
- Choose which courses appear on the Dashboard. By now, most faculty have more courses in their account than will fit on the Dashboard, and the courses that are there may be old or otherwise not the ones you want. Click on your All Courses link to choose the courses for your Dashboard (up to 10). On that page, click the "star" icon to select a course for the Dashboard. Un-star a course to remove it. Note that the stars only identify your "favorite" courses. Unstarring does not delete the course from your account.
2. Change the name of a Canvas course
Instructors have full capability to edit the display name of their Canvas courses. Open the Settings page and change the "Name" field. To change the course code (i.e., the 'short name' that appears at the top of the page inside a course), edit the "Course Code" field. Click "Update Course Details" to save your changes.
3. Camtasia can now upload into Panopto
Camtasia 2021 has a great new feature that allows you to export projects directly into the My Folder of your Stan State Panopto account. This makes it very easy to add content produced using Camtasia in a Canvas course while keeping your content safely in the 'walled garden' of Stan State tools. Camtasia 2021 is available faculty and staff only. Visit OAT's Camtasia information page to download and register the software.
4. Announcing "Discussions Plus" for enhanced Canvas discussions
OAT has initiated a pilot in Spring 2022 for a tool we're calling Discussions Plus. Discussions Plus offers several enhancements over the default Canvas discussions tool, such as multiple due dates for discussions and auto-captions on video recordings in posts. Check out our Discussions Plus overview and let us know what you think!
** Pardon the dust as we revamp the older tips on this page to make discovery easier for everyone! **
Canvas Tips
- NEW Use Module requirements to force course materials into a sequence
- NEW The Canvas Inbox cannot be disabled for specific courses
- Use "Until" wisely in Canvas quizzes
- Randomize/Shuffle questions in a "classic" Canvas quiz
- Add custom links to the course navigation in Canvas
- Understanding group discussions in Canvas
- Merge multiple Canvas sections to a single course
Panopto Tips
Zoom Tips
FlipGrid Tips
GoReact Tips
Older tips continue below...
With the abrupt pivot to remote learning, the following tips may be helpful.
1. Communicate your teaching plans
Use the PeopleSoft roster email tool first to email your class about what they can expect. Send subsequent communications using the Canvas Inbox tool or create an Announcement in each course. Canvas will relay both of those to the students via a notification, but students may have set up their Canvas notifications to delay receiving them.
2. Use Canvas' Zoom tool to schedule meetings
Use the Zoom tool in each Canvas course to schedule your course meetings. Both you and your students will use that tool to join the meeting - no need to send out a link separately.
Troubleshooting tip: If you see an error about your email address being "invalid" when trying to schedule a course meeting, first login to https://csustan.zoom.us and then return to Canvas and try scheduling the meeting again.
3. Find Zoom recordings in Panopto Recordings folder
Recordings of course Zoom meetings will be automatically available under the Panopto Recordings link in each course a couple of hours after the meeting is over.
If you do not wish the meeting recordings to be available automatically, you can either hide the Panopto Recordings link in the course navigation or enable the Approval Workflow to require manual approval of each video in that folder. See this page for more details: https://www.csustan.edu/office-academic-technology/canvas-how-control-availability-zoom-recordings
1. New Feature Alert - Use Hypothes.is for group annotations
2. Disable "seek" and playback speed in a Panopto video
At times, you may want to prevent students or other viewers from skipping ahead in your video (seeking) or changing the playback speed. Perhaps you have created a quiz at the end of a section of the video and viewers really need to have watched the video in order to successfully complete the quiz. Limiting seek and playback speed forces the viewer to watch the whole video as you intended it. Login to Panopto and click the Settings button for the video and choose "Manage" from the left-hand menu. Locate "Disable seek and variable speed playback" and change the setting as desired.
3. Prevent immediate availability of Zoom recordings in Canvas
Use Panopto's "Approval Workflow" to keep your course Zoom recordings unpublished until you're ready to release them to students. This workflow allows you time to edit the recording, if necessary, before releasing it for viewing in the Panopto Recordings area of your Canvas course.
1. Summer 2021 Update to Canvas + iClicker Cloud integration
Benefits of the RGS integration include:
- Quick & easy setup
- No need for any additional setup or preparation from inside Canvas. Connecting your Canvas course is done completely from inside iClicker Cloud in just a few clicks.
- Ability to pull your Canvas roster into the corresponding iClicker Cloud course
- Your Canvas roster is used to pre-populate your iClicker roster.
- Assistance in getting your students ready to use iClicker before classes start
- When you sync your roster, iClicker students with emails matching your Canvas roster will be automatically added to your course.
- If a matching account is not found in the iClicker system, we make it easy for you to let students know what they need to do to update their existing account or create a new account.
- No additional linking steps for students
- Students’ iClicker accounts are automatically linked to their Canvas identity by matching their email address. With RGS, students do not need to take any additional action, such as clicking a link in Canvas, to associate their account.
For more information about setting up RGS in a Canvas course, consult the iClicker documentation. If you need further assistance with iClicker Cloud, contact Stephanie Bragg at iClicker support.
2. New VoiceThread assignments coming June 30; Training session June 4
VoiceThread has improved the way instructors and students create, use, and grade assignments. Beginning June 30, all new VoiceThread assignments will use the new experience.
Features of the new experience include:
- No need to create two links in a course when you want students to create and share a VoiceThread with the class
- As part of the assignment creation, the instructor can tell VT to create a gallery view automatically. Students simply return to the same VT link in Canvas to view the gallery after submitting.
- Easily reuse a VoiceThread from semester to semester or in multiple sections in the same semester.
- The new workflow automatically makes a copy of your VT for use in an assignment. This keeps student comments from getting mixed up with other sections or semesters.
- Better instructions for students to understand exactly what they need to do to complete an assignment.
- VoiceThread will guide the student through the submission process more clearly.
- Improved grading interface
- Clearer understanding of who has not submitted and where they are in the process
- Ability to grade a student who has not fully submitted yet
Instructors can begin using the new workflow immediately if desired. The full switch-over will happen on June 30, 2021. Read the Instructor Guide (w/ demo video) || New assignments overview
1. Use Panopto with Moodle courses
Instructors who use Moodle can now use Panopto in their courses via the new Moodle integration. The Panopto tool is readily available in the Moodle text editor. Click the Panopto tool (
Important! Using the Panopto-Moodle intregration creates an account in Panopto that is independant of any Panopto account you might have as a result of using the Panopto-Canvas integration. For help accessing videos across accounts, contact oat@csustan.edu.
2. 'Email' your class using a Canvas announcement rather than an Inbox message
The Canvas announcement tool is a quick and simple way to compose a message to your entire class that will be relayed to the student via their email address. It also appears on their Canvas Dashboard and in the Canvas smartphone app. The Canvas Inbox tool is best reserved for contacting specific students or small groups of students. When sent via the Announcements tool, your message will be permanently stored as part of the course content, right on the home page. This is often easier to understand and harder to miss compared to using the Inbox. OAT often gets reports of students who do not receive Inbox messages, and it's confusing to try to understand that these messages are not actually 'email'. Using Announcements is a more efficient solution to classwide communication.
1. Request a dummy account for External Tools in Canvas
Canvas's "Student View" does not work for any content that has been added using an External Tool. For example, Student View cannot be used to test or check Turnitin assignments or VoiceThread assignments. This is because the Student View is not an real Canvas account, and all External Tools can only be accessed by real Canvas accounts.
2. How to conclude a Canvas course + Incompletes
At the end of the term, instructors can close their course by setting an End date in the Settings. This will make the course 'read-only' for all students while still allowing instructors regular access. Additionally, if specific students require extended access to the course to complete an incomplete, instructors can create a new section in the course and enroll those students there. The new section can be configured with its own End date overriding the date set in the general course settings. Existing activities can then be modified to add the new section and give it a custom due date, etc.
How do I change the start and end dates for a course?
How do I add a section to a course as an instructor?
3. Add Zoom recordings to VoiceThread presentations
It is now possible to import a Zoom cloud recording directly into a slide in a VoiceThread presentation. When adding media to the VoiceThread, simply choose the "Media Sources" option. Then, click the Zoom icon to view your Zoom account. Locate the recording and select it for import. VoiceThread will import and treat it as a video slide, much like any other mp4 video file.
1. Updates to the Canvas rich content editor coming January 16.
Canvas is rolling out an automatic update to the rich content editor (RCE) on January 16. The RCE is the tool you use to type and format text in many places in Canvas, such as discussion posts, pages, and assignment instructions. The update will affect all users, including students. Read more information about this change and learn what's new!
2. Merge Canvas sections to a single course
Instructors can merge the enrollments of one Canvs course into another, in a parent-child relationship. This enables you to deploy content in a single course while still preserving separate due dates for each section. Read more information about this option.
3. View Zoom attendance reports
You can obtain basic information about the attendance of your Zoom meetings, whether they are scheduled using the Canvas scheduler or via the regular web interface. Watch the video for instructions related to both cases.
1. Restore deleted items in Canvas
When you arrive at the Restore page for the coure, click the "Restore" button next to the item to be restored.
Note: the number of items available to restore is based on when you deleted them. If you don’t see the item on the list, you’ll need to contact OAT and we will work with Canvas to have it restored for you.
1. Understanding the "Until" setting in Canvas assignments and quizzes

It's easy to misunderstand how the "Available from" and "Until" settings work in the real world. They both seem to be about governing access to an item, but that's really only true of the Available from setting. Until is more nuanced: it governs when an activity must be finished.
- For assignments, this means when a submission must be received, even if the student clicked the link before the Until date.
- For quizzes, this means when all attempts must be completed, even if the student started the quiz before the Until date.
Important: the Until date will override a timer and autosubmit a quiz attempt if it occurs before the timer ends. So, if you use a timer and an Until date, be sure to confirm you've allowed enough of an availablitity window for the students to start and complete the quiz within the Until window. Also, communicate this information to your students: they must finish the quiz before the Until date even if time remains on the countdown.
Thus, it is not possible in Canvas to design a synchronous test (i.e., everyone starts at nearly the same time) and block a student who tries to start "late."
Additional Resources
- What is the difference between assignment due dates and availability dates?
- How do I make a quiz available before or after the due date?
2. Use Late Policy setting to automatically grade missing assignments at 0
More information: How do I apply a Missing Submission policy in the Gradebook?
3. Submit student paper to Turnitin.com using Quick Submit
- Go to the Turnitin website and request a new password using your Stan State email address. Then, log in.
- Enable Quick Submit for your account
- Submit a paper via Quick Submit
1. Deleting Panopto videos from a Canvas page
It's always good to add Panopto video to your Canvas course by embedding a video on a page, but sometimes you need to delete one. Unfortunately, the Canvas editor doesn't have an easy "one click" way to remove an embedded video because of the how the underlying HTML code works that makes embedding possible. Never fear! Read our how-to guide for instructions on removing a Panopto video from a Canvas page.
2. Track students' progress in a live Canvas exam
When you give a timed exam synchrously using Canvas, it is possible to monitor your students' progress while the exam is open. For example, this allows you to know at a glance who has finished and who is still working. To do this, simply open the quiz link in your course and then click Moderate This Quiz from the "Related Items" menu on the right. Students' progress will be indicated in the "Time" column of the page. To get further details about a specific attempt, click the student's name and then click the "View Log" link.
3. Use Turnitin with a Canvas grading rubric
Not only does Turnitin check student papers for plagiarism, it offers instructors a way to annotate, comment on, and grade submissions, with grades passed back to the Canvas grade book. But what if you want to grade submissions in the usual Speedgrader interface, with a Canvas rubric, while using Turnitin only for a quick plagiarism check? Here's how:
- Create the Canvas assignment first as a regular online submission assignment and then save.
- Next, create the Canvas rubric and enable it to be used for grading.
- Then (here's the cool part!), click the Edit button to edit the assignment and change the Submission Type to "External Tool", configuring it for Turnitin. Be sure to uncheck the box for "Load in a new tab".
When it comes time to grade, simply click the assignment link in Canvas. This will display the Turnitin inbox so you can quickly see the originality scores of the submissions. Off to the right will be the usual SpeedGrader tool. Click that to read the submissions and assign grades using the rubric.
BONUS: Record webcam video in Canvas using Panopto Capture - no software required
Panopto Capture is a feature in Panopto that enables all Stan State users to record their webcam and/or desktop without the need to download and install any software. Do this wherever you can access Panopto, such as in a module, or by editing a page, or by posting a reply in a Canvas discussion, etc. First, launch the Panopto integration and click the "Record" tab. Second, supply a name for your new recording. Third, click the red "Launch Capture" button. View screenshot. The Panopto Capture tool will open and you can begin your recording. After finishing, stop the recorder and wait for Panopto to process your video. Then, close the Panopto Capture tab to return to Canvas. Click the "Insert" button to insert the video. Read more information on how to use Panopto Capture.
Note: Panopto Capture is recommended over Canvas' built-in video recording tool because Panopto will automatically create and insert closed captions. If desired, students may use the built-in Canvas recorder for recordings that will only be viewed by the instructor.
1. Use Panopto to store video files
Uploading a video file directly into a Canvas course is not recommended because of file upload limits as well as accessibility issues. Instead, use Panopto! All instructors have personal video storage accounts as well as Panopto folders for their Canvas courses. To get started, login to Panopto and click "Create" to begin uploading your media files.
2. Add a Panopto video to a course
In Canvas, add a link to a Panopto video in a course module. Or, embed your video on a course page. Blackboard and Moodle courses can share a video via URL.
3. Track Panopto video engagement
When you add a Panopto video to a Canvas course (see Tip #2), you can also get information about which students have watched it and how much they've seen. Learn more about session statistics.
BONUS: Make your PowerPoint slides searchable in Panopto
In addition to speech transcription, Panopto can also read and transcribe your PowerPoint slides during recording. This means the text on the slide will be searchable by viewers who may want to review that portion of your recording. In the Panopto Recorder, simply check the "Record PowerPoint" box in the Slides panel of the recording setup. Bonus Bonus (because you've read this far...): if you use slide titles in the PowerPoint file, Panopto automatically converts the titles into a Table of Contents in the final video.
1. Add custom links to the course navigation in Canvas
2. Rename a course in Canvas
Sometimes Canvas’ user interface makes it impossible to tell courses apart, especially when you’re teaching multiple sections of the same course. The solution? Simply edit the name of the course on the Settings page to something more distinct. Be sure to make the new course name recognizable to students!
3. Use Turnitin with Canvas
Stan State’s site license for Turnitin is readily available in Canvas – no need to add the app to your own course. Instead enable Turnitin as an External Tool submission type in an assignment. Learn more at Turnitin + Canvas instructions.
BONUS: Allow students to choose their own breakout rooms in Zoom – just announced
Quick, update the Zoom software on your computer to version 5.3! Zoom has updated breakout rooms so meeting hosts can now allow participants to choose the breakout room they want to join. You can also allow them to move from room to room on their own. All meeting participants must be using Zoom 5.3 to take advantage of this new functionality.
Updated: January 29, 2025