
What Is Zoom?
Zoom is a tool for hosting online meetings and web conferences at Stanislaus State. Zoom is free for use by all current faculty, staff, and students. With Zoom, you can easily host and attend state-of-the-art video meetings right from your desktop, tablet, or smartphone. Use Zoom to give a PowerPoint presentation, demonstrate software, draw on a virtual whiteboard, or just meet virtually using a webcam It’s also easy to record your Zoom meetings for later use! All of Zoom's features can be accessed from the Zoom application that you install on your desktop computer or mobile device.
Online Support
- Complete online documentation for hosting meetings, inviting participants, and more!
- Watch the Planning and Hosting your On-Campus Zoom Event Training Video OR Read the Zoom Event Guide.
- Review the Overview of the Roles in a Meeting webpage.
In-Person Support:
- Visit the Support Page to find times and locations
- OR Call the Stanislaus State Technology Support at (209) 667-3687
Zoom Meetings
When a meeting is recorded using the Zoom cloud option (as opposed to the local computer option), the recording is kept in the Zoom account of the meeting host for 60 days and then deleted. Links to the recording can be shared by the host, but the links will expire after 60 days. However, the recording is also copied into the host’s account in Panopto where it is stored and retained/available to share for three years from the last time they’re viewed. Panopto is the university’s primary video storage and streaming service. Learn more about Panopto.
Zoom Desktop Client
This page contains step-by-step instructions for downloading and configuring the Zoom desktop client software.
Before downloading Zoom Client, search your computer to see if it is already there. Open Seach and type in Zoom. If it is there, Start up Zoom.
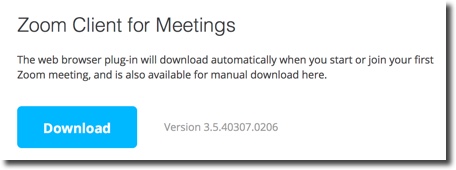
Part 1 - How to Download Zoom Client
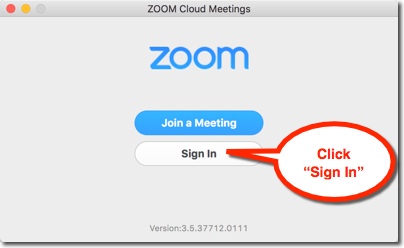
Part 2 - How to Sign In to Zoom
By default, you must sign in to Zoom in order to join meetings. You must sign in to schedule and host meetings.
Watch: 30 seconds to sign-in!
Note: this video has no sound.
Step-By-Step Instructions
1. Launch the Zoom client and click "Sign In"
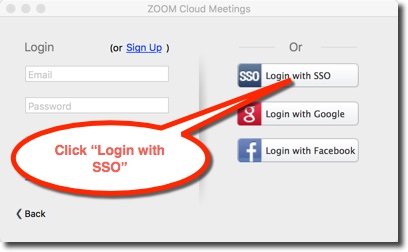
2. Click the "Login with SSO" button (Single-Sign-On)
Note: Do not fill out the email and password fields on this screen!
3. Enter the SSO URL
Enter "csustan" if prompted, to complete the given URL
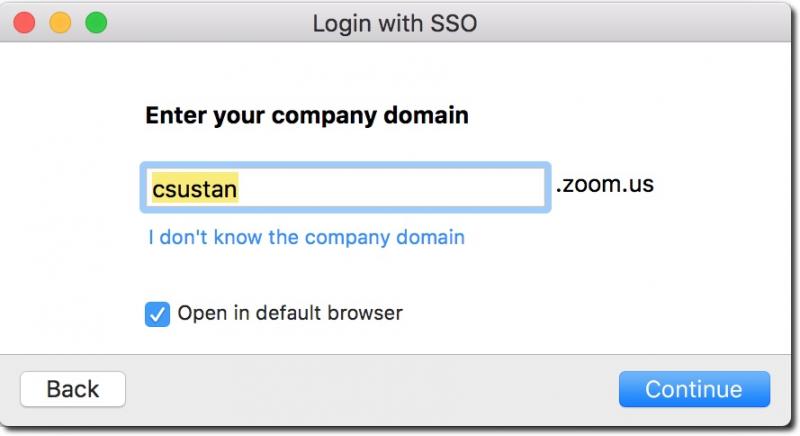
Note: This only needs to be done the first time you login to Zoom.
Click "Continue" after you enter the SSO URL.
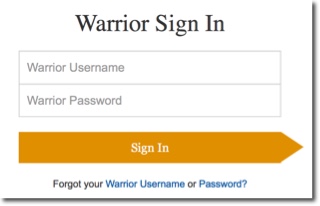
4. Enter your Warrior username and password
Zoom will transport you to the Stan State sign-in page. Enter your regular university username and password there.
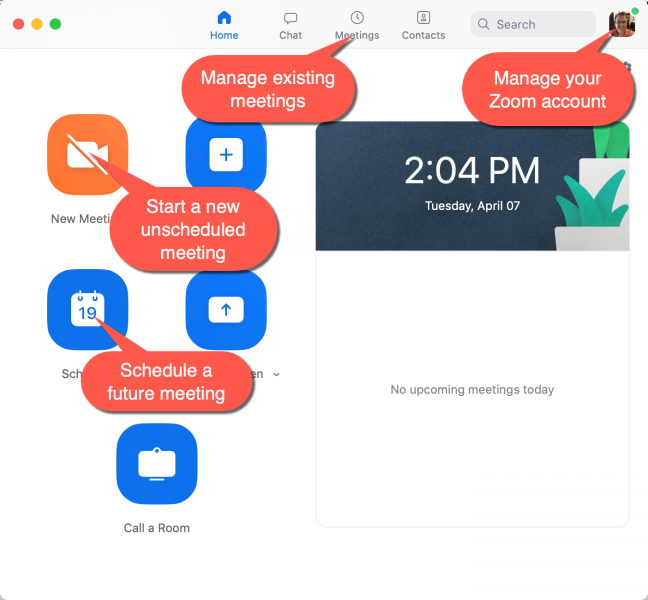
5. Return to the Zoom client
Note: Click the "Schedule" icon if you want to schedule a meeting in the future and invite attendees.
You can also:
- Manage your Zoom account
- Manage existing settings
- Start a new unscheduled meeting
- Schedule a future meeting
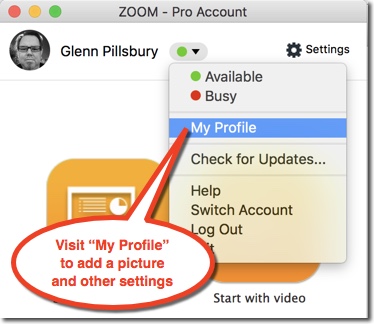
6. Add a picture and configure other user profile settings
Keeping Your Zoom Meeting Private and Secure
Zoom is a safe and private platform for your online meetings. However, there are privacy issues that users need to be aware of. Once in a meeting, unknown or unwelcome guests can join your meeting, known as zoom-bombing. They can listen in on discussions, capture screenshots, and even disrupt the meeting with unwanted and inappropriate video, audio, or shared content.
The following measures will increase the security of your Zoom sessions and reduce the chance of unwanted attendees. We recommend using as many of these options as you reasonably can without impacting your meeting operations and attendance. If you are discussing sensitive or confidential information in your meetings, these measures become significantly much more important.
Instructions are below if you like to read and follow along. There are also two training videos with guided tour on how to secure live events and meetings.
Keep Zoom Software Updated
Zoom is regularly updating their software with improvements and security enhancements. It is recommended that you update Zoom whenever prompted. Users can manually check for updates at any time by clicking "Check for Updates" in the user icon of the application window.
Meeting Links & Dial-in Information
If your meeting is not meant to be public do not post meeting links or dial-in information in public forums, like social media or on web pages.
Require Zoom Sign-in to Join a Meeting
When setting up your meeting you can require users to have signed into Zoom to join. If you enable this you can ignore "Meeting Passwords" below. There are two options: signed into Zoom with any Zoom account or signed in with an @csustan.edu Zoom account. For meetings with only affiliated individuals the signed in with an @csustan.edu Zoom account is appropriate to use. If you expecting guests who do not have a WarriorID the signed in with a Zoom account option will insure guests are known to Zoom and not anonymous.
- When scheduling a meeting, under Security, select Only authenticated users can join then choose Signed in to a Zoom account OR csustan.zoom.us
Allow or Block Entry from a Country/Region
Zoom allows a meeting host to choose which countries/regions are allowed to connect to a meeting. It can also be configured to block specific countries/regions. If you know all your attendees are in the US, or other specific countries/regions, we recommend you only allow access from those places.
- When scheduling a meeting, under Advanced Options, select Approve or block entry from users from specific countries/regions, in the pop up window select the allow or block action and fill in the country or regions to take the action on.
Meeting Passwords
Set a password for public meetings and webinars. Please consider the following when setting up a Zoom session:
- When scheduling a meeting, under Meeting Options, select Require Meeting Password.
- Please consider the following when picking a password:
- Passwords do not need to be complex if they are rotated frequently.
- If you are going to have phone participants numeric-only passwords are best.
Participants will be asked for this password in order to join your meeting.
You may distribute the meeting password using Blackboard or another secure method of distribution.
Enable the Waiting Room Feature
The Waiting Room Feature allows the host to control when each participant joins the meeting. As the meeting host, you can admit attendees one by one, or hold all attendees in the virtual waiting room and admit them en masse. This requires more work by the host, but only allows participants to join if you specifically admit them.
Disable Join Before Host
This is the default setting for all meetings. Please consider the following when setting up a Zoom session:
- If you are scheduling a meeting where sensitive information will be discussed, it's best to leave Enable to Join Before Host (found under Meeting Options when scheduling a meeting) turned off.
- Visit Zoom's Join Before Host help page for more information.
- Always assign an Alternative Host for all your meetings.
Appoint a Co-Host
Appointing a co-host fallows the host to share hosting privileges with another user, including blocking and removing participants. The host must assign a co-host. There is no limitation on the number of co-hosts you can have in a meeting or webinar.
Co-hosts should be watchful for guests using their video camera and microphone. Moderators should scroll down the list of video users as the meeting is in progress to be aware of any disruptive activity.
Limit Sharing With the Host
Zoom allows users to share screens, audio from another computer, and files. While in your meeting, please follow the guidance below to limit sharing with the Host:
- Click the up-arrow next to Share Screen.
- Select Advanced Sharing Options.
- Under Who can share, click Only Host.
This will not be appropriate when multiple participants need to share and collaborate, but setting this restriction will prevent unwanted guests from interrupting the meeting by initiating intrusive sharing.
Lock Your Session
The Zoom Host Controls allow the host or co-host to lock the meeting. Once all your attendees have joined, please consider the following security measures:
- If the Participants panel is not visible, click Manage Participants at the bottom of the Zoom window.
- At the bottom of the Participants panel, click More.
- From the list that appears, click Lock Meeting.
- Unlock the meeting following the same steps.
When a meeting is locked, no one can join, and you (the host or co-host) will NOT be alerted if anyone tries to join, so do not lock the meeting until everyone has joined.
Disable Annotation on Presentations or Whiteboard by Participants
This is enabled by default. If you do not want participants to be able to draw on your presentation or whiteboard you need to disable this for all your meetings or from inside the meeting. It is recommended this be disabled for meeting open to the public or guests.
Disable Annotation for all Your Meetings
- Open Zoom, click on your Profile picture in the upper right corner, go to the Settings option.
- In the Settings window, click View More Settings in the bottom of the General tab page, and log in to the Zoom web console.
- In the Zoom web console select Settings then In Meeting (Basic), and scroll down to the Annotation section, and turn on Only the user who is sharing can annotate. You can enable participants to annotate in your meeting but it will not be enabled by default.
Disable (or Enable) Participant Annotation in an Active Meeting
- In your meeting after you have shared your screen go to the floating meeting controls and click the More botton on the right.
- In the menu that drops down select Disable Annotation for Others, or Eanble Annotation for Others.
Enable Sound When a Participant Joins or Leaves
Enabling "Play Sound When Participants Join or Leave" creates a bit of extra noise, but it could also alert the host and co-host to the arrival of unwelcome guests.
To Enable Chime for All Meetings You Host
- Select Settings from the menu.
- Scroll down until you see the option Play sound when participants join or leave.
- Toggle this option On.
- Once enabled, you will see additional options: who hears the chime (just the host or all attendees) and whether participants should be prompted to record their names when joining by telephone.
- This setting will apply to all meetings you host, including ones that were scheduled before you changed the setting.
To Enable Chime for Meetings in Progress
- Click Manage Participants to view the Participant List of the meeting.
- At the bottom of the Participant List, select More.
- From the menu that appears, enable Play Enter/Exit Chime option.
Remove a Participant from a Zoom Meeting or Webinar
If despite these precautions, someone you do not know shows up in your meeting, you should take it seriously; it is possible that these incidents may result in disruption of classes/meetings, theft of service, phishing attempts to obtain confidential information, or unauthorized access to Stanislaus State services.
If you have already begun a session and find an unwanted attendee has joined, please take the following steps to remove the unwanted participant from a Zoom session:
- If the Participants panel is not visible, click Manage Participants at the bottom of the Zoom window.
- Next to the person, you want to remove, click More.
- From the list that appears, click Remove.
By default, if you remove participants or panelists from the webinar, they will not be able to rejoin using the same email address.
Reporting Unwanted or Disruptive Participants
If you encounter participants who are repeatedly in closed classes/meetings or disruptive please report the incidents to security@csustan.edu for follow up.
Resources
How to Keep the Party Crashers from Crashing Your Zoom Event - Zoom Blog March 20, 2020
A Zoom meeting is designed for interactive collaboration between a smaller group of participants, where everyone can actively contribute with video, audio, and screen sharing, while a Zoom webinar is intended for broadcasting information to a large audience where the primary focus is on a presenter(s) with limited attendee interaction, typically through features like Q&A and chat; essentially, a meeting is for discussion and collaboration, while a webinar is for presentation and information sharing to a large group.
When to use a Zoom meeting:
- Team brainstorming sessions, Client presentations with Q&A, and Small group training sessions.
When to use a Zoom webinar:
- Large-scale online conferences or workshops, Public lectures or presentations, and Product demonstrations to a large audience.
Do I need to download Zoom first?
- Hosting a meeting: Yes. See instructions above, "Download & Configure"
- Attending as a participant: Yes, but the meeting link will guide you through the process. No sign-in or special configuration is necessary to attend a meeting as a participant.
- All users: Zoom only needs to be installed on your device once.
How do I organize a Zoom meeting that will take place in the future?
Option 1 – Schedule in Zoom and Distribute Meeting URL (students, faculty, staff)
- Click the "Schedule" icon on the Zoom dashboard
- Create the meeting name and the date/time of the session
-
Most other settings can be left at the defaults.
-
To allow participants to enter the session before you arrive, open "Advanced settings" and enable "Join before host".
-
- Choose "Other Calendars" in the bottom Calendar section
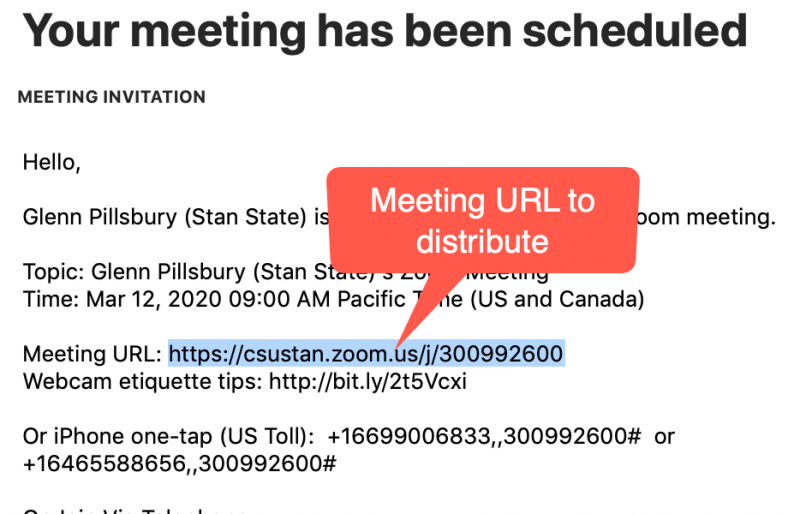
- Click "Schedule". A copy of the meeting invitation will appear.
- Highlight and copy the meeting URL

- The invitation also shows phone numbers that attendees can use to dial-in to your meeting with they don't have sufficient Internet access.
- Distribute the meeting URL to your attendees via email, or as a course announcement in Blackboard or Moodle. The recipient merely clicks the link and will join your meeting.
NOTE: If the recipient does not have Zoom installed, it will install itself before joining the meeting.
Option 2 – Create Reusable Zoom Link in Canvas (faculty only)
Please refer to OAT's instructional page on this topic by following this link.
Option 3 – Create Microsoft Outlook Meeting (faculty, staff)
NOTE: You must have the Zoom Plug-in for Microsoft Outlook installed for this option to work. Get it from the Zoom download page and then return here.
- Open Outlook and create a new Meeting that you will invite one or more people to.
- Configure the invitee name(s) and the date and time of the meeting, using the normal scheduling tools.
- Click the Add Zoom Meeting button to insert the Zoom connection information into the invitation.
- Click "Send" to send the invitation. The meeting will be added to your calendar like any other meeting.
- To join the meeting, open the calendar item and click the connection link in the meeting details
How do I host a Zoom meeting from my computer right now? (students, faculty, staff)
- Click the "Start Meeting" button. Your meeting is open!
- Invite others to join you:
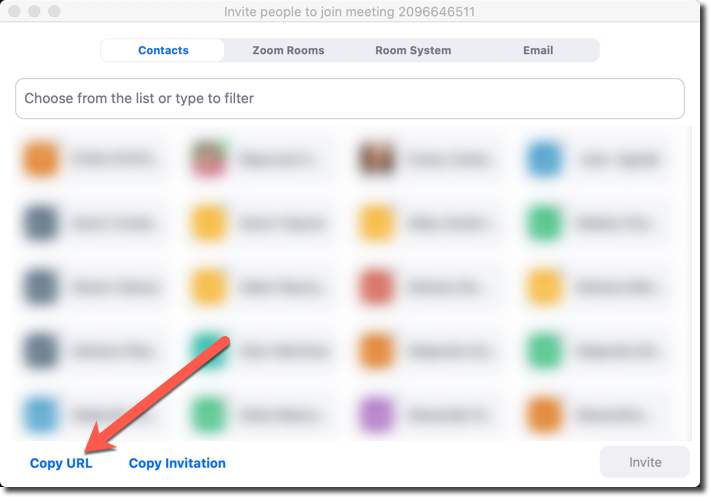
- Hover your mouse over the bottom of the screen
- Click the "Invite" icon to display the invitation options (see image)
- Click "Copy URL" in the lower-left to copy the meeting's URL
- Paste the meeting URL into a new email message and send it. The recipient merely clicks the link in the email and will join your meeting.
NOTE: If the recipient does not have Zoom installed, it will install itself before joining the meeting.
How many people can be in a Zoom meeting?
Zoom meetings that are hosted by Stan State faculty, students, and staff can contain 300 total participants.
What about a "Webinar"? Do I need to switch my account to a webinar account?
No. Webinars are Zoom meetings with thousands of attendees who might also be paying you to attend. The default "Meeting" account type is more than sufficient for all of your Zoom needs, including polls, breakout rooms, a shared whiteboard, etc.
Updated: June 17, 2025