This page contains information about using Zoom in a Canvas course. Part 1 covers creating easy course meetings for all class members to join. Part 2 covers how to make the meeting recordings available to students. Additional sections cover obtaining meeting attendance reports and various tips and tricks involving Zoom and Canvas.
Prerequisite: Sign in to Zoom
The Canvas-Zoom setup will not work until the instructor has signed in to a Zoom account on the web.
Sign-in location: Stan State Zoom Sign-In
Part 1: Easily Schedule Course Meetings
Course meetings are meetings where you expect all of your students to attend. The meetings can be one-off events or recurring meetings.
Note: Meetings scheduled using the Canvas integration are simply added as part of your existing Zoom account. The integration just provides a simple shortcut for everyone to join those meetings and access recordings. Canvas course meetings are not separate meetings outside your normal Zoom account and you can manage them and their recordings in the regular Zoom interface.
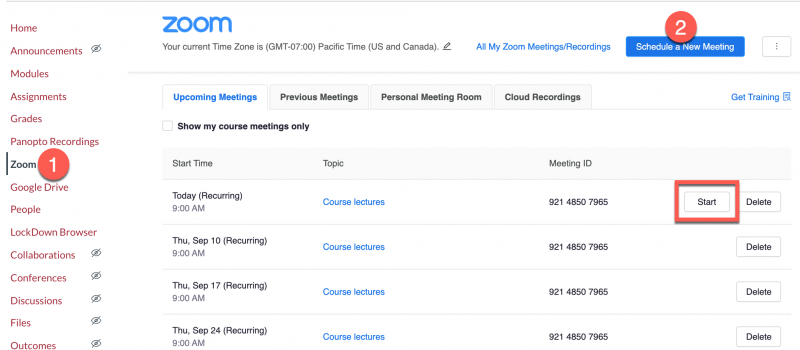
How to Schedule a Meeting
To schedule a meeting:
- Click the Zoom link in the Canvas course menu
- Click Schedule a New Meeting
- Configure the meeting details on the scheduling page.
Later, you can open the meeting by clicking the Start button.
How Students Join Meetings
Students can also use the Zoom link to join the meetings.
- Click the Zoom link in the course navigation menu
- Click Join for the meeting
Part 2: Sharing Meeting Recordings
Meeting recordings are available in both Panopto (permanently, no publishing required) and Zoom (deleted after 60 days, must be published).
» Meeting Recordings Available Via Panopto
After a Zoom meeting recording has been processed, it is automatically copied into Panopto and is immediately available in the Panopto Recordings area of Canvas. The video is available permanently or until the owner deletes it. The original Zoom copy is still available for 60 days, after which it will be deleted automatically.
» Meeting Recordings Available Via Zoom
Sharing original Zoom meeting recordings via Canvas involves publishing the recording on the Cloud Recordings page of the Zoom course home page.
Permissions Check: Review Zoom Cloud Recording Permissions
By default, Zoom cloud recordings made at Stan State require the viewer to be logged in to a Stan State Zoom account in order to be viewed. However, when a viewer tries to log in, they find Zoom's web login screen confusing. As such, many viewers are not successful at logging in. How do they watch the recording if they don't know how to log in?
As the owner of your recordings, you can remove the login requirement if you wish. You can remove it for all your recordings or only for specific recordings. In reality, disabling the requirement for your whole account is probably the best choice. There are no meaningful data security risks by doing this, and the recordings are not discoverable on the public Internet.
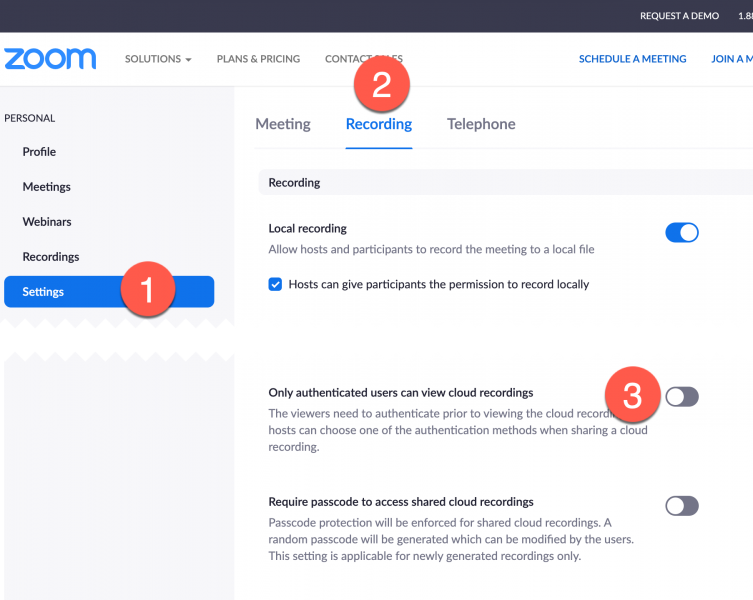
Disable the login requirement on your recordings
- Login to Stan State Zoom Log-In
- On the left, go to Settings > Recording
- Slide the setting "Only authenticated users can view cloud recordings" to the "off" position. The page will indicate the new setting has been saved.
The login requirement can be re-enabled for any recording that needs it by Viewing cloud recording settings.
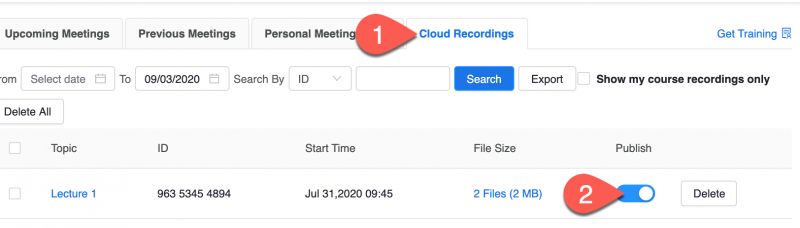
Publishing Zoom Recordings
Within the Canvas Zoom page, you must first publish any recording before students will be able to access it from the Cloud Recordings tab. Recordings are automatically deleted after 60 days. For unlimited access, share the Panopto link to the recording instead.
- Click the Cloud Recordings tab
- Click the Publish switch to the "on" position. The recording is now visible and available to the students.
Bonus Topic: Meeting Attendance Reports
Meeting hosts can obtain basic information about who attended a meeting and for how long. Reports are available for meetings scheduled using Canvas or not.
Zoom Tips & Tricks
Free of charge, below are some additional tips for using Zoom with Canvas!
Tip: Use Zoom for office hours in several courses
It's not possible to create a meeting using the Canvas integration in one course and have it be available to other courses through the Zoom link. Thus, multi-course meetings like office hours need to be handled differently.
- Use the Zoom desktop application (or your Zoom web account) to create a meeting for office hours.
- Configure the exact recurrence schedule or leave the recurrence as unfixed - simply reuse the meeting when you need to.
- In the meeting settings, check the box for "Waiting Room". This will allow you to admit participants individually.
- After saving the settings, locate the meeting URL on the confirmation page. It will look like: https://csustan.zoom.us/j/##########
- Share the meeting URL with the students. For example, share it as an Announcement in each course or as a custom link in the course navigation (explanation coming soon).
Tip: Record only the streams you really need
Stan State Zoom accounts are configured to record several "streams" of the same meeting - Screenshare view, Gallery view, Audio only, etc. By default, all of the streams are made available when you publish a cloud recording. However, the existence of multiple streams makes it hard for students to access things easily because Zoom does not label them in the Canvas integration.
Option 1: Disable unneeded streams in Zoom settings
- Login to your Zoom account: Stan State Zoom Sign-In
- On the left, go to Settings > Recording
- Scroll to the Cloud recording section
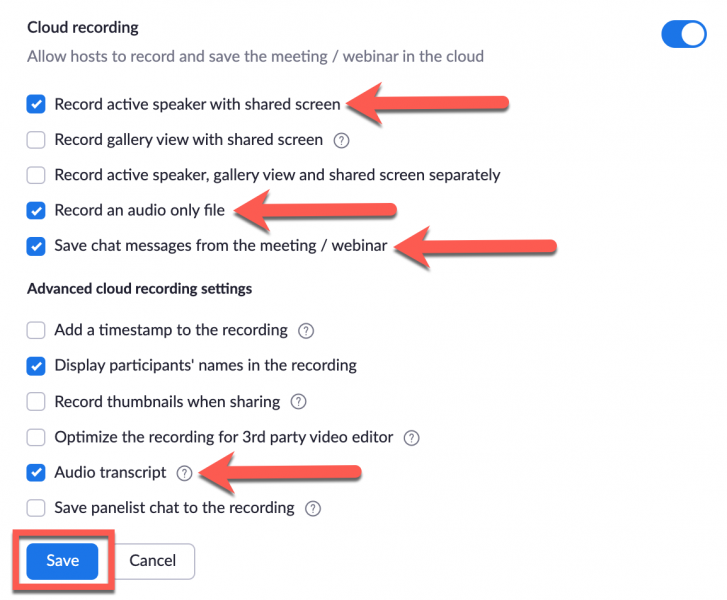
The following settings are a good minimum for users who are using Zoom for lectures and other basic class meetings. Uncheck any other options to prevent those streams from being recorded.
- Record active speaker with shared screen
- Record an audio only file
- Save chat messages from the meeting
- Audio transcript (this is needed for accessibility purposes)
Click Save to lock in the new settings.
Option 2: Manually delete unneeded streams from a specific recording without changing your account settings.
- Login to Stan State Zoom Recordings to arrive at your recordings home page.
- Click on the title of the recording in question.
- Hover over the stream to be deleted and click the "Trash" icon.

Delete the wrong file? Not to fear! Return to the Recordings home page in your account and click the Trash link on the right edge of the screen. You can restore a recording from the Trash area in your account.
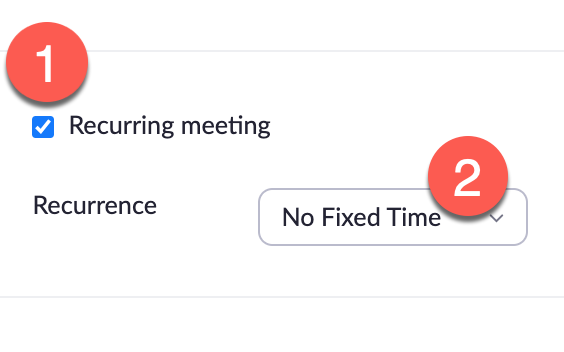
Tip: Set up a reusable meeting space without exact dates and times
You can create a Zoom meeting that can be used whenever you need it, for as long as you need it. It is a "recurring" meeting but the recurrences are not scheduled or fixed. Think of it as a room you can walk into and use anytime you want.
- When scheduling the meeting, check the box for Recurring meeting.
- In the Recurrence dropdown menu, choose "No fixed time"
Share the meeting URL with any participants who need it.
Later, start the meeting by clicking the Start button in your Zoom account in the Recurring Meetings area of your meeting list.
Updated: September 05, 2023